

 Ask AI


Editing Room
Choose an assistant. It opens with a ready-made question, reads this article and answers your questions.
Open in ChatGPT (opens in a new tab) Open in Claude (opens in a new tab) Open in Perplexity (opens in a new tab) Open in Gemini (opens in a new tab) Open in Grok (opens in a new tab) View as MarkdownChoose an assistant. It opens with a ready-made question, reads this article and answers your questions.
Open in ChatGPT (opens in a new tab) Open in Claude (opens in a new tab) Open in Perplexity (opens in a new tab) Open in Gemini (opens in a new tab) Open in Grok (opens in a new tab) View as MarkdownOn this page
On this page
Web Application
Introduction
Room editing allows full management of all details regarding the rooms in your property. You can easily update information such as room type, number of beds, or cleaning status, as well as add photos that will be visible in the online booking system.
The intuitive interface allows quick changes that automatically update in the system, providing guests with clear and up-to-date information about available rooms.
Instructions
Editing a room from the Calendar tab:
Go to the Calendar tab.
Click on the room you want to edit.
A form will appear on the screen, Click the Edit button.
A room editing form will appear on the right side of the screen. The form consists of 5 tabs: Details, Information, Cleaning, Photos, and Location.
Edit the selected fields.
In the lower right corner of the form, click the Save Changes button.
The room will be updated.
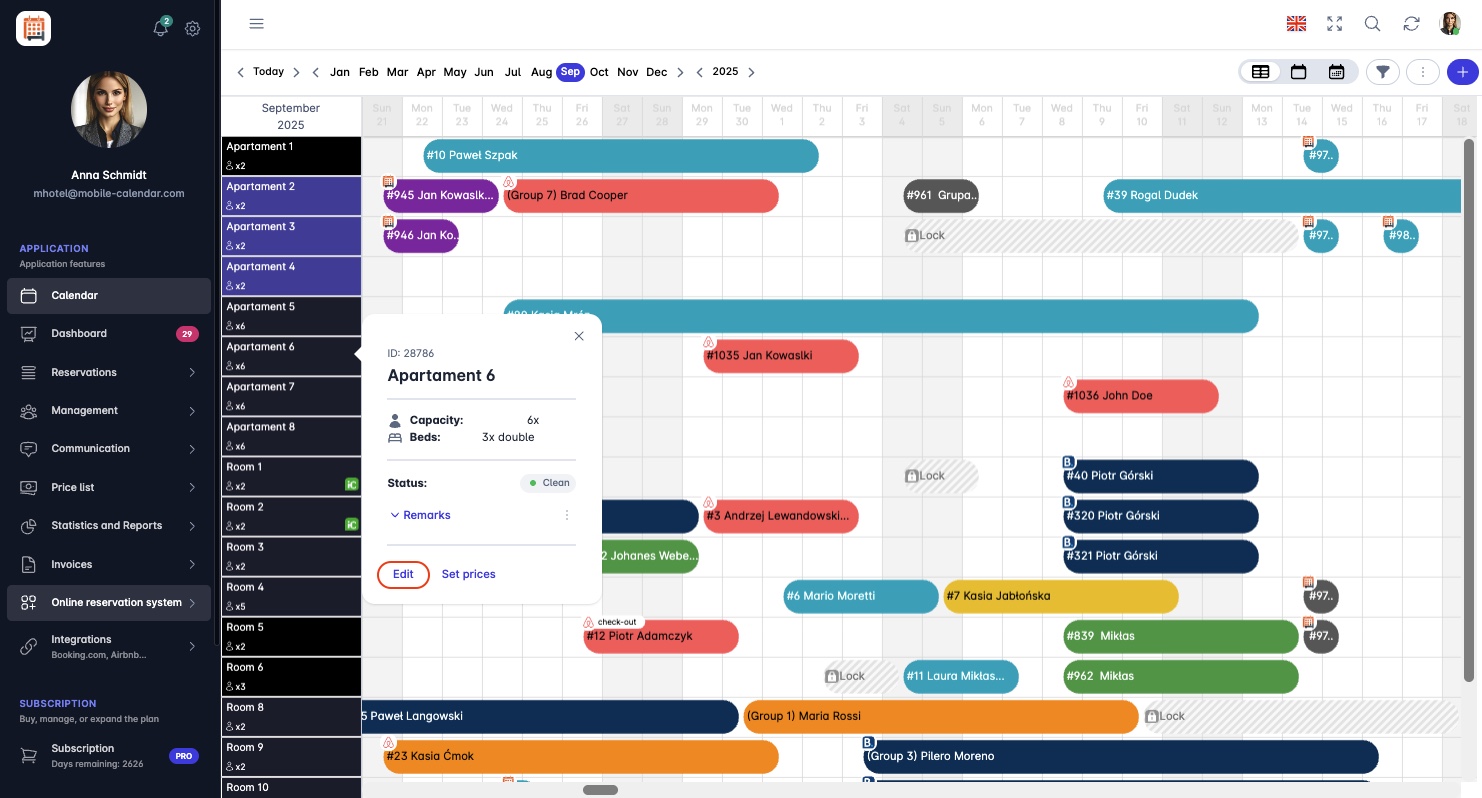
Room editing

Editing a room from the Management tab:
Go to the Management -> Rooms tab.
Select from the list the room you want to edit.
Click on the Notepad icon (Details column).
A room editing form will appear on the right side of the screen. The form consists of 5 tabs: Details, Information, Cleaning, Photos, and Location.
Edit the selected fields.
In the lower right corner of the form, click the Save Changes button.
The room will be updated.
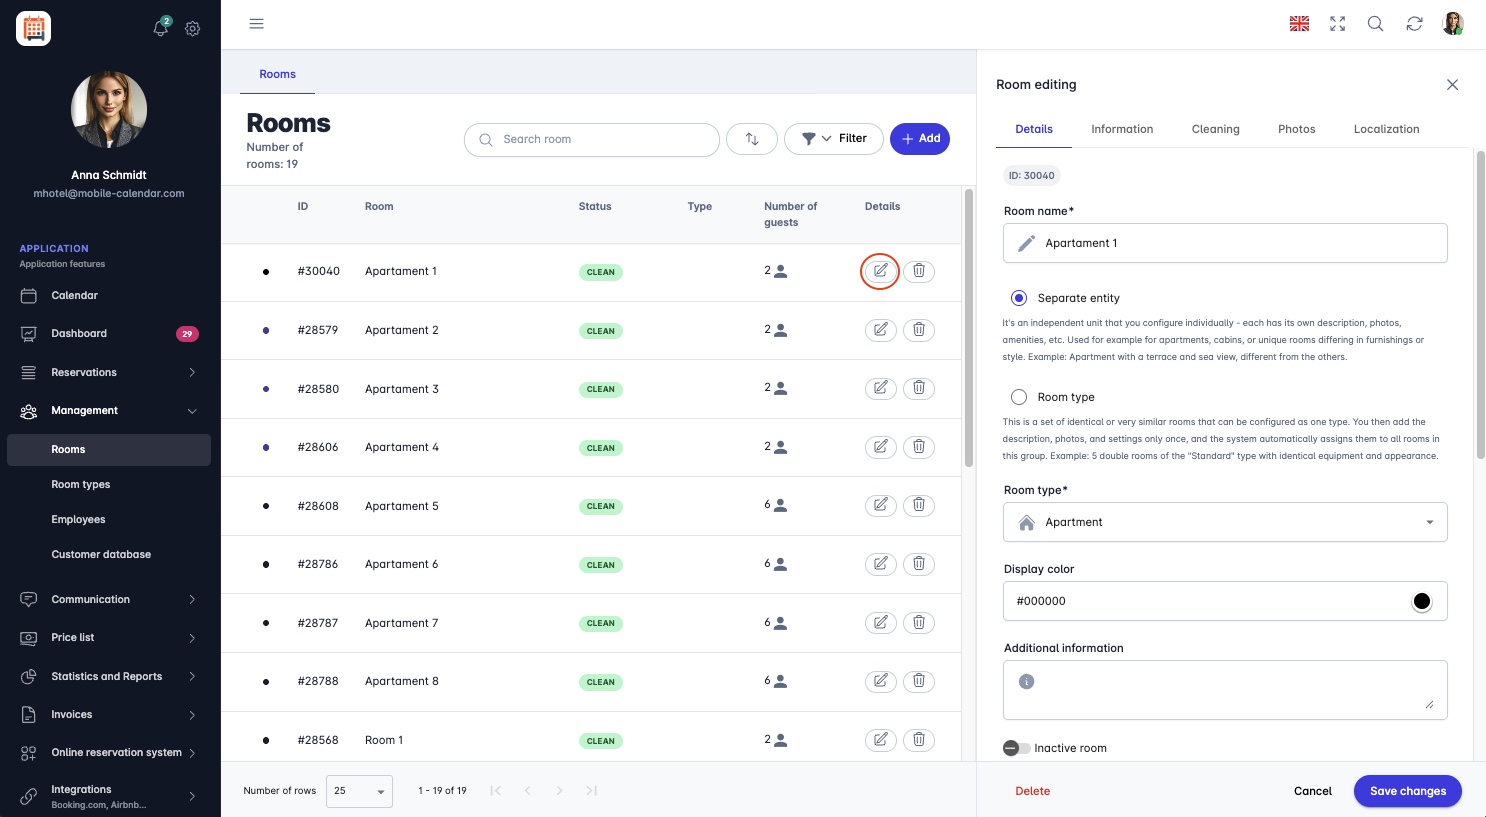
Room editing

Explanation of tabs in the room editing form
Details Tab
In the Details tab, adjust the necessary information about the room.
In the Room Name field, you can change the default name or leave it unchanged.
Determine whether the room is a Separate Unit or belongs to a specific Room Type group. Depending on the selected option, the editing form will differ in the range of available fields and configuration options.
Separate Unit – this is an independent room that is configured individually. Each one can have its own description, photos, location, and amenities. After selecting this option, the user can edit all tabs: Details, Information, Cleaning, Photos, and Location.
Room Type – this is a group of identical or very similar rooms that have common settings. In this case, editing of description, photos, and location is done at the room type level, not for an individual room.
If the Room Type option was selected, in the Room Type field, choose from the dropdown list a previously created type. If no type has been added yet, Click the Add new room type button.
If the Separate Unit option was selected, in the Room Type field, choose from the dropdown list one of 14 available options, such as Room, Apartment, or Cottage.
To change the room color, Click on the Display Color field and Select a color.

In the Additional Information field, enter additional information about the room.
To set the room as inactive, simply click the Slider named "Inactive Room".
In the Number of Beds section, choose how many and what type of beds are in the room.
There are 3 options available: Single, Double, and Extra beds. The "+" button adds more beds, while the "–" button removes them. The Maximum Number of Guests field automatically updates and shows the total number of places in the room.
Additionally, decide if you want to limit the number of adults and children:
By checking the checkbox Do you want to limit the number of adults who can be accommodated here?, you activate the Maximum Number of Adults field, where you can enter or set a limit.
Similarly, by checking the second checkbox regarding children, you can specify the Maximum Number of Children.
Information Tab
- In the Information tab, the user can manage data regarding the room. To make the room available in the online booking system, Click the slider named 'Share in offer'.
The Description field is used to describe the room. To add a description in multiple languages, select the appropriate option from the dropdown list, e.g., English, and then enter the text in English. The description is saved automatically. A user of the online booking system who selects English will see the information in that language.
At the bottom of the form, the user can add room amenities. From the list of available amenities, simply Click on the appropriate item, e.g., Air Conditioning. A marker will appear in the box next to it, confirming that the feature has been added.
Photos Tab
In this section, you can add up to 8 photos that will be visible in the online booking system. To add photos, Click on the dedicated field, which will open the file browser, or Drag the selected photos directly into that field.
To save changes, click the Save Changes button.
Cleaning Tab
In the Room Status field, you can select the room status from the dropdown list. Available options are: Clean, Dirty, and In Cleaning.
- Changing the room status causes a colored dot to automatically appear in the calendar view next to the room. For example, if the room is marked as "Dirty", a red dot will appear in the calendar, and when the status changes to "In Cleaning", the icon will change to a yellow dot.
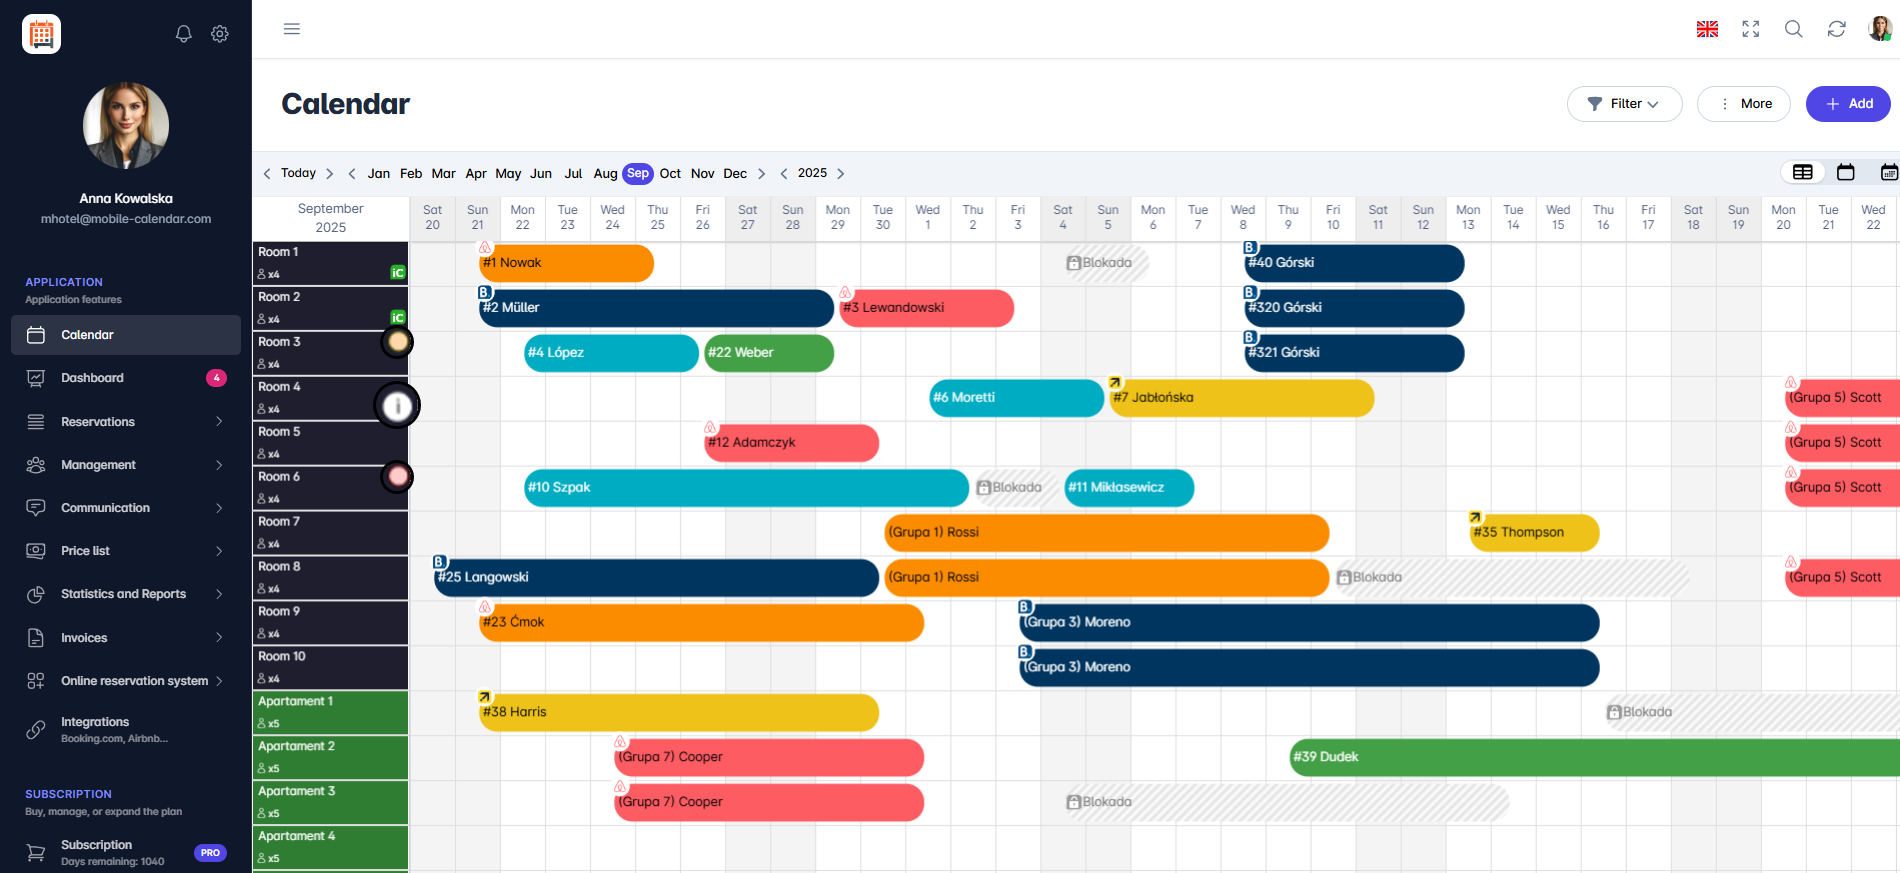
Room status "Notes", a field where the user can enter their own text, adding additional information regarding the room or cleaning. Adding a note will display an information icon in the calendar view next to the room.

Photos Tab
In this section, you can add up to 8 photos that will be visible in the online booking system. To add photos, Click on the dedicated field, which will open the file browser, or Drag the selected photos directly into that field.
Location Tab
By checking the checkbox "The room is located at a different address than the main property", you activate the ability to assign the room or apartment to a different address than the main property. This allows you to add and manage additional locations at different addresses.
Then Click the Manage Locations button.
A 'Manage Locations' form will appear on the screen. Click the +Add Location button.
In the Search field, enter the address, e.g., street name and city, to search for a place on the map.
Fill in all required fields marked with an asterisk (*): Street, Number, Postal Code, City, and Country.
After entering the data, Click the Create Location button in the lower right corner to save the new address.
The new location will be added to the list and will be available for selection when editing rooms.
Mobile Application
Introduction
In the room form, you can change its name, type, color, beds, description, and amenities. You can open the form from the room list or the calendar.
Instructions
In the bottom menu, go to the More tab.
Go to Management -> Rooms.
Tap a room in the list.
The "Edit room" form will appear. Change the fields you need on the Details, Information, and Amenities cards.
Tap Save.

- Your changes will be saved, and the room list will appear on the screen.
Opening the form from the calendar
In the bottom menu, go to the Calendar tab.
Tap the room name on the left side of the calendar.
A list of options will appear. Tap Edit.
Inactive room
You can mark a room as inactive, for example, if you know it will be under renovation for several months. An inactive room will be grayed out in the calendar. This setting is for informational purposes only for your property.
On the Details card, scroll down to the "Status" section.
Turn on the Inactive room toggle and tap Save.
Was this article helpful?
Ask AI about this article
Choose an assistant. It opens with a ready-made question, reads this article and answers your questions.
Ask AI about this article
Choose an assistant. It opens with a ready-made question, reads this article and answers your questions.